mBot ranger is a 3 in 1 remote control robot and a fun way to get started programming with drag and drop block coding and plenty of features for the more advanced programmer.

Find out about STEM Educational Robots and Devices at Makeblock.com and Makeblock.com - mBot Ranger
The above two links are affiliate links so I will receive commission on any sales made from these links.
The mBot Ranger by Makeblock is a 3 in 1 STEM (Science, Technology, Engineering, and Mathematics) educational robot for children 10+ and is a great device to learn to code with. It can be used as a remote control robot using a mobile app, which has access to all the sensors or you can follow the step by step coding tutorial to get the basics of block coding, based on the popular Scratch coding platform for kids, it’s fun for adults too.
Myself and my kids have used Scratch to create programs which was fun but I think controlling an actual robot or other device with your code makes the experience a lot more rewarding.
So what is the mBot Ranger:
The mBot Ranger for ages 10+ is the next level up from the mBot Neo aimed at ages 8+. It has three forms:
- The “Land Raider” an all terrain tracked robot
- The “Dashing Raptor” a speedy three wheeled robot
- The “Nervous Bird” is a two wheel balancing robot
 The control board is a Makeblock Me Auriga using a ATmega2560 microcontroller that can be programmed in Makeblock, Scratch style block coding or for the more advanced programmer, the Arduino IDE language.
The available sensors for the robot are:
- Ultrasonic object detection up to 400 cm
- Two light intensity sensors
- A line following sensor using two infrared sensors for detecting black and white
- Temperature sensor
- A sound sensor
- Gyroscopic sensor for detecting rotation, pitch and tilt movement.
Then for feedback there are:
- 12 LED ring of programmable multi-colour leds
- Buzzer
The control board can be programmed via Bluetooth or USB.

The ultrasonic sensor and line following sensor, connect to the 10 easily accessible RJ45 connectors on the main board. All other features are built in.
The RJ45 connectors are the big square connectors that are found on Network cables and are easily fitted and removed compared to fiddly smaller connectors that it is not clear which way they go such as micro usb. The USB connector to upload your programs is the larger USB B type which is also clearer which way it fits by its shape compared to the more common USB A type. All perfect for kids to easily fit and remove.
There are add-on packs available to add more sensors and features to the Ranger.
The Ranger is controlled by 6 AA batteries. I am using 2100Mha rechargeable batteries as this will be a lot cheaper than using Alkaline batteries. A lithium rechargeable battery is also available separately.
I don't know how long the batteries are lasting because of the way its being used. The Ranger uses the USB power when it is connected to a PC while being programmed. It lasted long enough for all the family to try out the features and do various bits of programming. It seemed long enough to have a fun session with it and recharge the batteries for the next day.
Software
The Ranger won’t be much fun without some way to control it. In this case I think the software is well set up for all abilities. From just wanting to use the Robot as a remote control vehicle to the experienced programmer. The main target for the software is for beginners.
The mobile app called MakeBlock is available for iOS or Android and has various options available over a Bluetooth connection.
This is the main app to control the Ranger Robot.

The Play option allows control the the Ranger in several ways;

- Drive - use the Land Raider as a remote control vehicle
- Drive and Run - draw a squiggly line on the screen and the Land Raider drives the same squiggly route
- Musician - play preset tunes through the Rangers buzzer or use the on screen piano keys to play a tune. Also good for working out notes when programming a tune.
- Voice Control - use simple commands such as Go Forward to make the Land Raider to move
- Line Follow - Put the Land Raider in Line Follow mode on the supplied Makeblock Ranger Test Pad
- Avoid Obstacles - Put the Land Raider in Avoid mode. It drives around on it's own turning when the Ultrasonic Sensors detect a close object.
- Racing Car - This is to control the faster Dashing Raptor robot as a remote control vehicle as it is more difficult to control using the Drive option for the Land Raider
- Nervous Bird - This is to control the two wheel balancing robot.


The Build option is a 3D animated step by step instruction manual to build each of the robots forms.


Create allows you to design your own control panel to control the robots motors and sensors. Custom controls can be added to some elements using Block style coding to make your own unique control panel.
Programming Fun
 If you are completely new to programming then the Code section in MakeBlock starts a separate tutorial program called mBlock Blockly. This teaches a novice to program the Ranger in Block code from the very basics to a level where you can program the Ranger yourself. This is done in a fun, clear and interactive way with Mr Panda as your guide. There are 10 tutorials, each one guide's you through an aspect of programming the Ranger. These include challenges so you have to change the code to achieve the task and not just follow what is shown.
I think this is a good guide and would encourage someone who has never coded before and think it's too complex, to someone who can enjoy getting the Ranger Robot to do as they command and enjoy the experience.
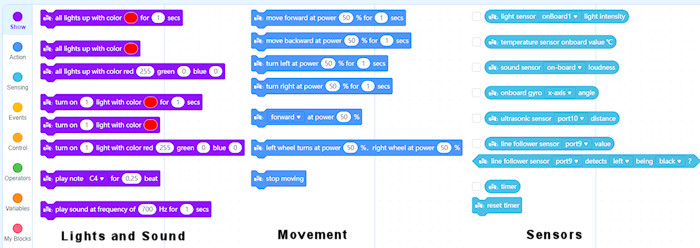
Block Coding
Then there is mBlock for Block based drag and drop programming and the Arduino language for more advanced coding. mBlock is available on the Web, Android, iOS, Windows and Linux.

mBlock gives you access to all the Rangers sensors and controls as well as the expansion sensors if you plan to buy more sensors for the robot from the Makeblock store.
Can I program the mBot Ranger in Python?
I mostly program in Python which is not currently available for the Ranger but it is available for the mBot Neo. The mBot Ultimate which is a 10 in 1 robot can be connected to a Raspberry Pi which also gives the option to use Python as well. So if python programming is important to you then there are other options.
Updating the Firmware
The Ranger’s firmware is used to connect to the MakeBlock mobile software over Bluetooth. When you write your own code in mBlock on the web/PC then the firmware is overwritten so that the MakeBlock mobile app options are no longer available.
When you want to use MakeBlock again you will need to connect the Ranger to web/PC mBlock and upload the MakeBlock firmware. This is simply done with three mouse clicks.
So make sure your program is saved to your MakeBlock account or your PC before the MakeBlock mobile app firmware is reinstalled.
Building the mBot Ranger
 Part of the fun is the actual building of the Ranger and the satisfaction of creating something.
The Ranger Robot comes in pieces that you have to construct using nuts and bolts. All tools are supplied and a lot of spare fittings in case any get lost or damaged, including a spare motor cable.
The metal frame is not made of cheap thin metal but is sturdy and of good build quality. These looked to be able to put up with the demands of rebuilding the robot's forms and bangs and crashes along the way.
The quality of the Instructions is where a lot of un-built toys and models fall down. Thankfully not in this case. The instruction booklet is mostly clear, there were a couple of points where I used the wrong holes. In addition to the booklet, the MakeBlock app also has step by step animated instructions which make the process a lot easier. You can reference both if there are any points of confusion.
My family all got involved in building the “Dashing Raptor” between them. For this we just used the instruction booklet which took about 1 hour 15 mins to build.
At a later stage I decided to make the “Land Raider”. For this the “Dashing Raptor” had to be fully dismantled before the “Land Raider” could be built. This also took me 1 hour 15 mins but I did have to backtrack some steps as I misplaced a piece. It became quicker as we change the models more.
The “Land Raider” only took 8 minutes to dismantle before building the next robot form.
This was the “Nervous Bird” which needs the least amount of parts so it only took 10 minutes to build. The next build of the Dashing Raptor took only 30 minutes.
The bolts have an allen key head to tighten with. I had a couple which slipped when tightening but as there are extra bolts, you can just swap them out. I also found an actual allen key, I had, was a tighter fit than the supplied tool in some cases. I would have still been able to build it without that though.
So what is it like to use the mBot Ranger?

So thats what features are available but what is it like to actually use.
The first time you switch on the Ranger you will need to connect it to the web/PC version of mBlock to update the firmware. Then you are ready to go to use the MakeBlock app on your device.
This is where our choice to build the Dashing Raptor first caused us some issues. The Drive option for using it as a remote control vehicle has a picture of the Land Raider, for good reason. It is slower so the controls are more sensitive.
When using it on the Rapid Raptor the thing is fairly uncontrollable spinning around all over the place especially on a smooth floor. We eventually worked out that we should be using the Racing Car controls. Suddenly it became a lot more fun and controllable but we were still crashing it into things.
This highlighted one issue with the design. If the crash is quite hard or the robot goes upside down, which the tracked Land Raider does if it clips a wall at a shallow angle. The batteries pop out. The battery cradle is designed to slide out for quick access, which is easily done for the Land Raider and Nervous Bird but the Dashing Raptor has the back wheel in the way. So you will have to try and push the batteries down with the screwdriver or remove the back wheel. The battery cradle needs something to clip the batteries into place. This is manageable but an area for improvement.
Out of all the Play options, the Drive, Line Following and Avoid Obstacle options are the ones we mostly used.
The Draw and Run is fun but didn’t always go where we expected and should only be used with the Land Raider. The Rapid Raptor will just spin a lot.
The Musician has some built in tunes that the Ranger plays through its buzzer, such as Happy Birthday and would be more used by the musically minded.
The Voice Control uses simple direction keywords to control its movements, briefly fun but we preferred the Drive option.
The kit comes with an oval line following track printed on paper. This is a good start to get the idea how it works. Though the paper can easily get crumpled or even ripped if it is not held flat as the grippy tracks of the Land Raider makes it way round. Now this may be negative but actually I think it is a positive.
Do it yourself

The point is, it is a programmable robot. The MakeBlock options are the standard basic options for some fun and also to show you what the robot can do.
To solve the issue of damaging the paper, it is for the Land Raider to follow the line at a slower speed and not spin round in circles looking for the line when it is lost.
So now is the time to look at the mBlock coding program and create a slower line following robot that stops when it gets lost or drives backwards to look for the line.
I have created some line follow tracks that can be printed on paper in poster mode and taped together. (These are available at the base of the article).
By writing our own line follow program it was able to follow the lines without damaging the paper. It’s not 100% and does lose the line completely at times but it mostly works and was fun to do.
Earlier I highlighted the issue of the batteries popping out if the Land Raider goes upside down. As there is a gyro sensor on board it can detect when it is not on a flat surface. So you can build an object avoidance program, using the ultrasound sensors and gyro that detects if the Land Raider tilts upwards. If so, it stops and reverses. Then the batteries will be fine.

As there is a 12 multicolour led ring, a buzzer, sound sensor and thermometer and gyro on the control board. These are always fun to program different effects and sounds. So programming it is not just about moving. You could take the control board off of the robot and have fun with those features as well. This will work from the USB on a computer so when your robots batteries need recharging you can still have fun.
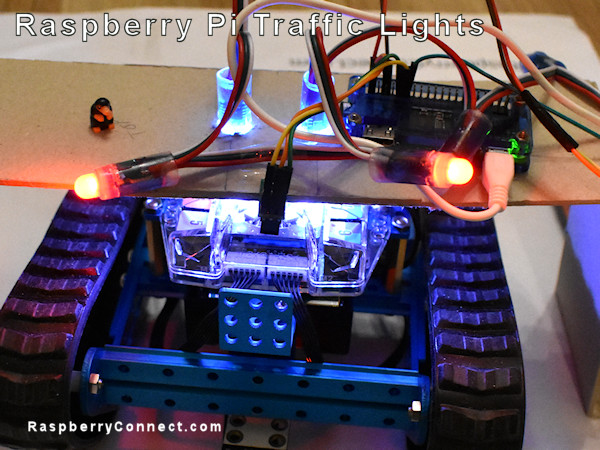
mBot and Raspberry Pi Traffic Lights
 I thought I would make a traffic light system. For this is used a Line Following Track that has a junction. The traffic lights control of the Ranger goes left or right at the junction.
I decided that I would use a Raspberry Pi to detect the Ranger with a InfraRed distance sensor. On detecting the Ranger two white lights shine down from the bridge towards the Rangers light sensors.
The Ranger will detect the brighter light causing it to stop.
The Raspberry Pi would then randomly light just the left or right white light.
This will then tell the Ranger to either take the left route of the right route based on the mBlock code that was installed.
The Raspberry Pi is mounted on a cardboard bridge across the track. I used some old WS2811 programmable LEDs to show the white lights to the Ranger and colour lights so I know what it is doing.
This worked well except for the odd occasion when the Ranger wasn’t quite in line of the lights. The light didn’t meet the threshold on both sensors for it to stop, so it just went round again.
Final Thoughts
The Ranger is a good quality robot and the software is well designed for it's target audience. I would have loved to have one when I was 10 unfortunately this type of thing wasn't around, At the time programming was wrongly considered only for the more intelligent, thankfully attitudes and software has changed and these devices prove how easy it is to get into programming.
The educational value is high and a great device for anybody who wants to learn programming and robotics but doesn't know where to start. It would be ideal for home, schools and clubs to use for fun education and to spark an interest on to bigger things.
The Land Raider is fun to use as the main robot and was the one we mainly programmed. The Dashing Raptor is also good fun but less controllable on smooth surfaces. The Nervous Bird is the one we laughed at the most, we didn't drive it about much but it's just fun to watch it try and keep it's balance. The kids found it hilarious if it is tapped at one end as it whizzes about trying to keep it's balance. It's just fun!.
The Nervous Bird falls over often when it fails to keep it's balance or it is tapped a bit hard by an over excited child. This causes the batteries to pop out most of the time. The battery cradle can easily be slid out on this robot frame so you can put the batteries back, but can become tiresome. I also found that the Bluetooth kept disconnecting on my two tablet with the Nervous Bird which I didn't get with the other forms. Though it did happen occasionally with the others. I don't know if this was just an issue with my setup or if the Nervous Bird uses more power causing the Bluetooth to be unstable especially if the batteries are starting to get low.
The Line Following program I think is set too fast as It can damage a paper track but you can easily programme your own line following program to be slower.
For some extra fun the control board case is Lego compatible, as you can see in the pictures, Lego Loki enjoyed taking a ride while we had fun with the Ranger. (Loki not included)
Overall I would recommend the mBot Ranger to anyone wanting to get started in programming Robots of any age as well as Schools and Clubs. Especially to anyone who is interested but thinks it will be too difficult to programme as they will be pleasantly surprised.
A set of three Line Following Tracks are available for printing, mBot Line Following Tracks
Links to the Makblock site for more information about their STEM Robots and Devices Makeblock.com
Link to more information about the mBot Ranger Makeblock.com - mBot Ranger
The above two links are affiliate links so I will receive commission on any sales made from these links.
This is my video to show some of the features from the review.
(p)
I would like to thank Makeblock for supplying the mBot Ranger for this review. All views are my own from using the mBot Ranger and not influenced by Makeblock.
raspberryconnect.com is a participant in the GoAffPro Affiliate Program, an affiliate advertising program designed to provide a means for sites to earn advertising fees by advertising and linking to the partner site